虎克的博客

Enthusiasm Biogeography-Biodiversity Informatics-Data Sciences

TextMate设置和使用手册

| Comments

TextMate Basics Tutorial

Welcome to the TextMate Basics Tutorial. After having setup your TextMate, this Tutorial will show you around the basic features of TextMate. This is a must for everyone who wants to use TextMate seriously.

This Tutorial starts rather unusually with an insight of TextMates Extensibility and Bundle System and also will show off the built-in editing features. I find this “Understanding TextMate” Section is essential for every user.
Soryu

Notice: Part of this Tutorial is available in Japanese at fraction.jp. 有難う Yuanying!

Content


Understanding TextMate

When you edit a file, TextMate recognizes the file type (in most cases) and provides several specific commands to work with that file.

Let’s assume you are editing an HTML file. TextMate will recognize the following extensions as HTML: html, htm, shtml, xhtml, phtml, php, inc, tmpl, tpl1. Furthermore, if your file starts with an HTML DOCTYPE declaration it will be recognized as well.
Based on that the file is syntax-highlighted according to the ‘HTML Language Grammar’ that is defined in the ‘HTML Bundle’.

Let’s take a look what those Bundles are about, shall we?

Bundles

Bundles are Containers for certain functionality, mostly Language-centered. Feel free to open the ‘Bundle Editor’ from within TextMate with ???B (Window → Show Bundle Editor).
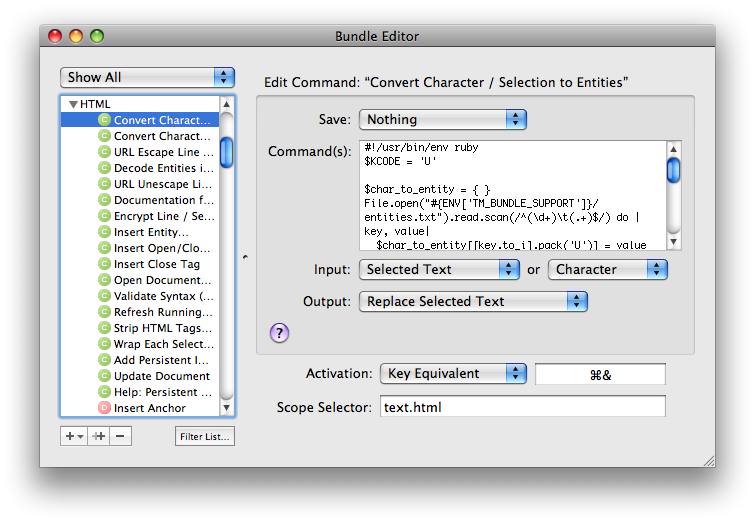
Bundle Editor

I have selected the first Command in the ‘HTML Bundle’. Don’t be scared right off by the funny program source in the text-field to the right.
All the items that are grouped under the “HTML” headline on the left are specific things to HTML. There are Commands that will transform characters or open a window with Documentation for an HTML Tag, Drag Commands that will let you Drag’n&rs

   original link:
   <a href='http://Apiaceae.github.io/blog/2009/10/16/TextMate%E8%AE%BE%E7%BD%AE%E5%92%8C%E4%BD%BF%E7%94%A8%E6%89%8B%E5%86%8C/'>http://Apiaceae.github.io/blog/2009/10/16/TextMate%E8%AE%BE%E7%BD%AE%E5%92%8C%E4%BD%BF%E7%94%A8%E6%89%8B%E5%86%8C/</a><br/>
   &nbsp;written by <a href='http://Apiaceae.github.io'>Hooker</a>
   &nbsp;posted at <a href='http://Apiaceae.github.io'>http://Apiaceae.github.io</a>
   </p>

EOL程序出错后批量处理数据库的方法

| Comments

在调试EOL程序过程中难免由于处理意外出现数据关联或数据完整性的错误。下面的代码就是批量重新建立示例数据库的方法。

drop database eol_development;
drop database eol_data_development;
drop database eol_logging_development;
create database eol_development default charset=utf8;
create database eol_data_development default charset=utf8;
create database eol_logging_development default charset=utf8;
use eol_data_development;


RAILS_ENV=development rake db:migrate;
rake truncate RAILS_ENV=development; rake scenarios:load NAME=bootstrap RAILS_ENV=development —trace
drop database eol_test;
drop database eol_data_test;
drop database eol_logging_test;
create database eol_test default charset=utf8;
create database eol_data_test default charset=utf8;
create database eol_logging_test default charset=utf8;
use eol_data_test;

EOL网络生命大百科系统介绍

| Comments

前言

网络生命大百科全书(Encyclopedia of Life: http://www.eol.org,简称EOL )是史无前例的科学研究群体和公众共同合作的网络信息共享平台。其目标是为所有人提供完全免费获取的有关世界生物有机体的知识。任何人都可以通过登记注册成为EOL的成员,向其提供生物物种的文本、图片、多媒体、评论或标签等信息。EOL专门的专家管理系统来保证从各个研究项目、个人所提供数据的质量。目前已经有超过40多个研究组织加入了EOL系统。为了加强EOL信息从类群和生境方面的覆盖度和深度,最近它们又发起了海洋生物物种专题项目,目标是在未来的5年内完成世界海洋生物物种80%的信息和数据。通过研究人员和公众的共同努力,我们有理由相信它将会成为世界上最好和最有影响力的生物多样性信息系统。EOL是一个完全开放和共享性的生物多样性信息系统。

EOL承诺以最小的限制条件提供给用户完全自由使用的信息。这是通过知识共享许可协议(creative commons license)来实现(简称:CC协议)。知识共享协议的含义是,比如:当一个网友把他的原创作品上传到EOL的图片管理中心,他就可以在一个自由内容许可协议下实现对其作品的自由而广泛地传播,其他网友可以自由的复制、传播、进行再创作、演绎该作品,但使用者必须按照作者指定的方式对作品进行署名,且在传播该作品时向他人清楚地展示许可协议条款。采用知识共享许可协议,在让作者得以自由安排作品的著作权利的同时,将促进作品的合法分享、演绎、合法再使用(share, remix, reuse-legally),这不会排斥,反而有利于作者的作品得到著作权法以及其他相关法律的更好的保护。同时,EOL也承诺在其门户上展示的所有数据都必须清楚的标明所有信息和数据的来源,并且鼓励和要求使用者引用这些信息和数据的原始来源。

EOL项目的生物多样性信息学小组(Biodiversity Informatics Group)负责EOL网站和相关信息工具的开发和维护。这个小组与数据提供者保证紧密合作,无缝集成大量网站的物种信息到EOL的物种页面。他们也正在开发一些新的信息工具来捕获、组织和以新的方式展现生物多样性知识。EOL门户的原型系统在2008年1月发布后,EOL项目组重新改善了系统运行的软硬件环境。并在2009年2月发布了增强的系统。通过与欧洲分布式分类学协会开放的的Scratchpad合作,EOL还设计了一个供专家使用的在线数据管理工具-LifeDesk。LifeDesk能够加速专家知识的搜集和科学管理。通过点击物种各项数据的版权信息和自动提交数据工具。EOL还致力与语义环境下全球名称体系的建立。其目的是促进机器与机器间对物种名称信息相关联的识别和信息交换。这个小组的第一个项目全球名称索引将促进名称按照命名学和分类学目的规范使用,更重要的是它能够使我们有效的组织和管理有机体的其他信息。

一、数据来源和审核 {style=“font-size: 16px” align=“left”}

EOL门户的物种数据是通过(物种)内容合作伙伴(Content partner)的形式,由个人、组织或研究机构来提供的。通过签署相关协议,合作伙伴与EOL的具体工作小组保持紧密联系,提供有明确的数据来源和授权使用协议的的物种信息,由EOL门户网站来展示相关物种信息。合作伙伴所提供的数据可以是在线的数据库系统,也可以是像文本、电子表格等的平面文件。在提交数据前,合作伙伴需要通过EOL门户进行注册登记,完成注册成员的审核后,EOL将提供给注册用户相应的权限来提交、管理自己的数据。

EOL的数据目前来自43个合作伙伴,内容覆盖了物种名录、数字化标本、图片、物种的保护信息、生活史甚至电子期刊等多个方面(表1)。这些合作伙伴都有它们自身的网站和数据库系统,EOL并没有收集这些网站上的所有内容。而是根据EOL物种内容架构(Content Schema)标准从这些网站“定制”所需要的物种信息,并周期性的从这些合作伙伴的系统更新相应的物种信息。

1. EOL目前的合作伙伴(Contentpartners)

对于加入了EOL合作伙伴的信息系统来说,你只需要做的工作就是在其门户网站进行注册。在EOL门户注册作为合作伙伴后,你就可以通过在线方式提供你的数据。注册过程必须要填写的是合作伙伴的名称和联系人。这样EOL的小组联系人可以联系你商讨进一步详细的数据提交和合作内容。另外,作为合作伙伴,你并不需要提供你所有的数据信息,而是按照EOL的内容架构来整理已有数据的格式。但作为合作伙伴,你必须遵守知识共享协议的要求。

EOL门户提供了一套比较完整的机制来处理来自个人、组织和研究项目的物种数据。它通过对注册用户的分级管理,实现对数据来源、数据质量和是否适合发表等信息状态进行控制,用不同的颜色背景来标记不同审核状态、数据质量的单个信息内容。

EOL门户上的物种数据包括四种主要数据类型:1、动态图像(Moving Image):例如动画、电影、电视节目等动态;2、声音(Sound);3、静态图像(Still Image):例如绘画、素描、平面设计图、地图等;4、文本(Text)。因此,任何用户都可以向EOL提交物种这几种格式的数据。

如果你是一个个人用户,希望提供某种生物的文本描述某些物种信息,你可以通过的通过点击EOL门户上物种页面的添加按钮,或者在物种信息列表栏左下角的添加链接(图1)。新添加的文本开始都会被黄颜色的背景标记(图1),这表明这些信息还没有得到专家的审核。在你提交数据后,物种页面管理员(专家)将对你所提交的信息进行审核,并且根据你所提供内容的情况确认其质量及其是否适合正式发布。


1. 向物种页面添加信息按钮和链接,物种信息没有得到专家审核的状态 

EOL欢迎所有提供图像和多媒体信息的提供者。最简单的方法是把你的图片和多媒体数据提交到Flickr网站的EOL图片组Encyclopedia of Life Images。需要注意的是向Flickr提交的图片必须是你自己拥有的,而不是从其他网站或其他地方获得的。EOL门户的数据采集程序将定期检查图片小组上的数据,并且更新EOL门户上的数据。近来,EOL门户也开始从WikimediaCommons采集图片信息。因此,用户也可以向WikimediaCommon

Ruby测试程序出错的解决方法

| Comments

当开始测试Ruby测试程序时,出现we are sorry something wrong, 然后检查log文件夹里面的development.log文件发现如下
错误信息,“no such file to load sqlite3 rails”。出现错误的原因是sqlite3-ruby版本本身的bug,解决的方法是:
 
Suggestion is DO NOT using sqlite3-ruby version =1.2.2, try to using
version 1.2.1.
I fixed it this same problem, through:
# gem uninstall sqlite3-ruby
# gem install sqlite3-ruby -v=1.2.1

如何在Linux上安装Apache 2

| Comments

Apache 2 Installation


prerequisites

Before you begin, it is highly recommended (though not inevitable) to create a system user and user group under which your Apache server will be running.

groupadd www

useradd -g www apache2

What is it good for? All actions performed by Apache (for instance your PHP scripts execution) will be restricted by this user's privileges. Thus you can explicitly rule which directories your PHP scripts may read or change. Also all files created by Apache (e.g. as a result of executing your PHP scripts) will be owned by this user (apache2 in my case), and affiliated with this user group (www in my case).

download source

Get the source from http://httpd.apache.org/download.cgi ( httpd-2.2.4.tar.gz ). These instructions are known to work with all 2.x.x Apache versions.

unpack, configure, compile

Go to the directory with the downloaded file and enter:

tar -xzf httpd-2.2.4.tar.gz

cd httpd-2.2.4

./configure —prefix=/usr/local/apache2 —enable-so —with-included-apr

The configure options deserve a little bit more of detail here. The most important –prefix option specifies the location where Apache is to be installed. Another commonly used option –enable-so turns on the DSO support, i.e. available modules compiled as shared objects can be loaded or unloaded at runtime. Very handy.

To compile some modules statically (they are always loaded, faster execution times), use –enable-module option. To compile a module as a shared object, use –enable-module=shared option.

For all available configuration options and their default values check the Apache documentation or type ./configure –help.

SSL support

To support secure connections, you need to specify –enable-ssl option when you run ./configure. In addition to that, you will also have to configure your httpd.conf file later.

Note: Make sure that openssl is installed on your system before you run ./configure with –enable-ssl. If not, download the latest version from http://www.openssl.org/source/ , unpack, configure, make, make install. You will also need to generate server certificate. Place server.crt and server.key into /etc/ssl/apache2/ directory and make them readable by Apache2.

configuration example

For example, to compile the mod_rewrite module statically and mod_auth_digest as a DSO, and to enable secure connections, enter:

./configure —prefix=/usr/local/apache2 —enable-so —enable-rewrite —enable-auth-digest=shared —enable-ssl

Tip: If you are upgrading from older Apache version, you may want to copy config.nice from the directory to which the previous version was unpacked (if available) to where you unpacked the new Apache tarball file. Run ./config.nice instead of ./configure. This way all the previously used configure options will be applied to the new installation effortlessly.

Once you configured everything as you like, compile and install the ROR开发人员应该知道的工具箱

| Comments

这个网站太酷了,收集了很多Ruby Gems。值得好好研究。网站地址:http://ruby-toolbox.com/

最好的50个用Ruby on Rails开发的网站

| Comments


Twitter - Social Networking

Yellow Pages - Online Directory

Scribd - Document Sharing

Hulu - Tv & Video Streaming

Blinksale - Online Invoicing

Crunchbase - Company Profiler

Justin.tv - Live Video Streaming

Slideshare - Presentation Sharing

Medhelp - Social Health Community

Funny Or Die - Video Humor Website

Github - Social Coding

Odeo - TV Streaming

Jango - Music/Internet Radio

About Us - Website Profiler

43Places - Social Destination Sharing

43Things - Social Todo Lists

Lighthouse - Bug/Issue Tracking

Shopify - Hosted Ecommerce Solutions

Kongregate - Flash Games

iLike - Music Social Network

Streeteasy - New York Real Estate

A List Apart - Online Design Magazine

MTV Style - Fashion/Design Portal

Jobster - Job Board

Icon Buffet - Stock Icons

Get Satisfaction - Customer Feedback

Soundcloud - Music Sharing

Crazy Egg - Analytics/Visualisation

Teenormous - T-Shirts

Searchles - Social Search

Pitchfork - Music Reviews

Userscripts - Browser Addons

JobScore - Job Marketing Platform

Corkd - Wine Social Network

Customize - Desktop Customisation

Chow - Food & Recipes

CourseAdvisor - College Search

Ziki - Business to Business Marketplace

Spock - People Search

Penny Arcade - Online Comic

Geni - Family Tree/Genealogy Network

Blingee - Social Network Glitter Graphics

RedBubble - Social Art Community

LinkedIn - Job Social Network

Last.fm - Music Social Network

Campfire – Business Group
   original link:
   <a href='http://Apiaceae.github.io/blog/2009/09/24/%E6%9C%80%E5%A5%BD%E7%9A%8450%E4%B8%AA%E7%94%A8Ruby+on+Rails%E5%BC%80%E5%8F%91%E7%9A%84%E7%BD%91%E7%AB%99/'>http://Apiaceae.github.io/blog/2009/09/24/%E6%9C%80%E5%A5%BD%E7%9A%8450%E4%B8%AA%E7%94%A8Ruby+on+Rails%E5%BC%80%E5%8F%91%E7%9A%84%E7%BD%91%E7%AB%99/</a><br/>
   &nbsp;written by <a href='http://Apiaceae.github.io'>Hooker</a>
   &nbsp;posted at <a href='http://Apiaceae.github.io'>http://Apiaceae.github.io</a>
   </p>

JIRA + MySQL + Confluence 安装

| Comments

JIRA + MySQL + Confluence 安装

<tbody>
    <tr>
        <td class="ellipse"><span class="bvTitle"><strong><font size="3">JIRA + MySQL + Confluence 安装</font></strong></span></td>
    </tr>
    <tr>
        <td class="bvh8">&nbsp;</td>
    </tr>
    <tr>
        <td id="msgcns!804037BC681CF72D!112">
        <p>
        JIRA + MySQL + Confluence 安装
        </p>
        <p>
        &nbsp;
        </p>
        <p>
        &nbsp;&nbsp;&nbsp;&nbsp; 官方有详细文档:<a href="http://www.atlassian.com/software/jira/docs/latest/"><font color="#004377">http://www.atlassian.com/software/jira/docs/latest/</font></a>
        </p>
        <p>
        &nbsp;&nbsp;&nbsp;&nbsp;<strong><font size="4"> 1.1 </font></strong><a href="http://www.atlassian.com/software/jira/docs/latest/requirements.html"><strong><font size="4" color="#004377">安装前确认软硬件配置需求</font></strong></a>
        </p>
        <p>
        &nbsp;&nbsp;&nbsp;&nbsp;&nbsp;&nbsp;&nbsp;&nbsp;&nbsp; (1) 软件需求:
        </p>
        <p>
        &nbsp;&nbsp;&nbsp;&nbsp;&nbsp;&nbsp;&nbsp;&nbsp;&nbsp;&nbsp;&nbsp;&nbsp;&nbsp;&nbsp;&nbsp;需JAVA支持,已内嵌 HSQL 数据库引擎,如用于正式应用,建议使用 <a href="http://www.mysql.com/"><u><font color="#800080">MySQL</font></u></a> or <a href="http://www.postgresql.org/"><u><font color="#0000ff">PostgreSQL</font></u></a>。
        </p>
        <p>
        &nbsp;&nbsp;&nbsp;&nbsp;&nbsp;&nbsp;&nbsp;&nbsp;&nbsp;&nbsp;(2) 硬件建议:&nbsp;
        </p>
        <ul>
            <li>&nbsp;评估安装&nbsp;需要 1.5GHz 主频+ 256MB 内存即可; </li>
            <li>&nbsp;10-20个项目/100-200用户/1000-5000问题数,需要2.8GHz主频 + 256-512MB内存 </li>
            <li>&nbsp;更多更大项目/10万问题数,&nbsp; 1G内存足够了 </li>
        </ul>
        <p>
        &nbsp;&nbsp;&nbsp;&nbsp;&nbsp;&nbsp;&nbsp;&nbsp;&nbsp;&nbsp;&nbsp;&nbsp;&nbsp;&nbsp;&nbsp;作为参考 <a href="http://jira.atlassian.com/"><u><font color="#0000ff">jira.atlassian.com</font></u></a> 有14,000问题和10,000用户,最高负载没分钟30个页面需求,目前使用双2.8GHZ Xeon CPU + 450MB内存
        </p>
        <p>
        &nbsp;&nbsp;&nbsp;&nbsp;&nbsp;&nbsp;&nbsp;&nbsp;&nbsp;&nbsp;&nbsp; 
        </p>
        <p>
        <font size="4">&nbsp;&nbsp;&nbsp;&nbsp; 1.2 </font><a href="http://www.atlassian.com/software/jira/docs/latest/java.html"><font size="4" color="#004377">安装JAVA JDK,设置JAVA_HOME,及添加JDK可执行目录bin到path路径</font></a>
        </p>
        <p>
        &nbsp;&nbsp;&nbsp;&nbsp;&nbsp;&nbsp;&nbsp;&nbsp; JIRA 运行需要JDK 1.3 或更高版本,可从 <a href="http://java.sun.com/j2se/1.5.0/jdk/download.jsp"><u><font color="#0000ff">Sun&#39;s website</font></u></a>&nbsp;下载windows&nbsp;offline 版本安装:
        </p>
        <p>
        <strong>&nbsp;&nbsp;&nbsp;&nbsp;&nbsp;&nbsp;&nbsp;&nbsp;&nbsp;Linux </strong>用户要 要安装<strong>xorg-x11-deprecated-libs包</strong> (Fedora) 获类似支持包以避免如下错误:
        </p>
        <pre>
                                    java.lang.UnsatisfiedLinkError: /opt/j2sdk1.4.2_11/jre/lib/i386/libawt.so: libXp.so.6: cannot open<br />
        <br />
                    <br />
        <br />
                                    shared object file: No such file or directory<br />
        <br />
                    <br />
        <br />
                                            <br />
        <br />
                                <br />

        <table border="0" cellspacing="0" cellpadding="0" width="100%">
            <tbody>
                <tr>
                    <td width="9" height="10">&nbsp;&nbsp;&nbsp;&nbsp;&nbsp;&nbsp;&nbsp;&nbsp;&nbsp;&nbsp; </td>
                    <td>
                    <h3>&nbsp;设置JAVA_HOME系统环境变量</h3>
                    </td>
                    <td>&nbsp;</td>
                </tr>
                <tr>
                    <td>&nbsp;</td>
                    <td bgcolor="#a5b6c6">&nbsp;</td>
                    <td>&nbsp;</td>
                </tr>
            </tbody>
        </table>
        <br />
                    <br />
        <br />
                                <br />
        <br />
                    <br />
        <br />
                                            <br />
        <br />
                                <br />

        </pre>
        <p>
        &nbsp;&nbsp;&nbsp;&nbsp;&nbsp; &nbsp;&nbsp; 在控制面板,右键点击&ldquo;我的电脑&rdquo;图标,选择属性
        </p>
        <ol>
            <li>点击&ldquo;<strong>高级</strong>&rdquo; 页 </li>
            <li>点击&ldquo;<strong>环境变量</strong>&rdquo;按钮 </li>
            <li>点击 &ldquo;<strong>新建</strong>&rdquo; 系统环境变量 </li>
            <li>设置 <strong>JAVA_HOME</strong> 指向 Java安装目录,不是 Bin目录. </li>
            <li>cmd 或 Dos 下执行&nbsp;%Java_Home%\bin\javac, 确认变量设置无误 </li>
        </ol>
        <p>
        &nbsp;&nbsp;&nbsp;<font size="4">1.3 </font><a href="http://http//www.atlassian.com/software/jira/docs/latest/install.html"><font size="4" color="#004377">安装JIRA,直接解压即可</font></a>
        </p>
        <p>
        &nbsp;&nbsp;&nbsp;&nbsp;&nbsp;&nbsp;&nbsp;&nbsp;&nbsp;&nbsp; <a href="http://www.atlassian.com/software/jira/downloads/binary/atlassian-jira-enterprise-3.6.2-standalone.zip"><font color="#004377">http://www.atlassian.com/software/jira/downloads/binary/atlassian-jira-enterprise-3.6.2-standalone.zip</font></a>
        </p>
        <p>
        &nbsp;&nbsp;&nbsp;&nbsp; <font size="4">1.4 </font><a href="http://www.atlassian.com/software/jira/docs/latest/standalone-dbconfig.html"><font color="#004377"><font size="4">安装MySQL数据库</font>,创建JIRADB,同时下载 JDBC for MySQL 驱动jar文件到Jira/common/lib/目录</font></a>, 注意数据库设置使用UTF-8支持中文&nbsp; http://<a href="http://www.mysql.com/"><font color="#004377">www.mysql.com</font></a>
        </p>
        <p>
        &nbsp;&nbsp;&nbsp;&nbsp;&nbsp;&nbsp;&nbsp;&nbsp;&nbsp; 按照要求编辑conf/server.xml和atlassian-jira/WEB-INF/classes/entityengine.xml,注意数据库名和前面创建要一致:
        </p>
        <ol>
            <li>安装MySQL:http://dev.mysql.com/downloads/ </li>
            <li>创建JIRA连接用户(如 <strong>jirauser</strong>). </li>
            <li>创建JIRA数据库 (如 <strong>jiradb</strong>). </li>
            <li>确认数据库JIRA连接用户有权限连接数据库、创建和使用数据表 </li>
            <li>
            <p>
            把MySQL JDBC driver jar 文件拷到 <span>common/lib/</span> 目录. <a href="http://ekylin.spaces.msn.com/mmm2006-06-19_17.24/#specific_databases"><u><font color="#0000ff">[download driver]</font></u></a> 
            </p>
            </li>
            <li>
            <p>
            编辑 <strong>conf/server.xml</strong> 文件,&nbsp; 设置用户名、密码、驱动类名、数据源 url参数:
            </p>
            <pre>
                                            &lt;Server port=&quot;8005&quot; shutdown=&quot;SHUTDOWN&quot;&gt;
            &lt;Service name=&quot;Catalina&quot;&gt;
            &lt;Connector port=&quot;8080&quot;
            maxHttpHeaderSize=&quot;8192&quot; maxThreads=&quot;150&quot; minSpareThreads=&quot;25&quot; maxSpareThreads=&quot;75&quot;
            enableLookups=&quot;false&quot; redirectPort=&quot;8443&quot; acceptCount=&quot;100&quot; connectionTimeout=&quot;20000&quot; disableUploadTimeout=&quot;true&quot; /&gt;
            &lt;Engine name=&quot;Catalina&quot; defaultHost=&quot;localhost&quot;&gt;
            &lt;Host name=&quot;localhost&quot; appBase=&quot;webapps&quot; unpackWARs=&quot;true&quot; autoDeploy=&quot;true&quot;&gt;
            &lt;Context path=&quot;&quot; docBase=&quot;${catalina.home}/atlassian-jira&quot; reloadable=&quot;true&quot;&gt;
            &lt;Resource name=&quot;jdbc/JiraDS&quot; auth=&quot;Container&quot; type=&quot;javax.sql.DataSource&quot;
            username=&quot;<strong>[enter db username]</strong>&quot;
            password=&quot;<strong>[enter db password]</strong>&quot;
            driverClassName=&quot;<strong>com.mysql.jdbc.Driver</strong>&quot;
            url=&quot;<strong>jdbc:mysql://localhost/jiradb?autoReconnect=true&amp;amp;useUnicode=true&amp;amp;characterEncoding=UTF8</strong>&quot;
            <strong>[ delete the minEvictableIdleTimeMillis and timeBetweenEvictionRunsMillis params here ]</strong>
            /&gt;
            &lt;Resource name=&quot;UserTransaction&quot; auth=&quot;Container&quot; type=&quot;javax.transaction.UserTransaction&quot;
            factory=&quot;org.objectweb.jotm.UserTransactionFactory&quot; jotm.timeout=&quot;60&quot;/&gt;
            &lt;Manager className=&quot;org.apache.catalina.session.PersistentManager&quot; saveOnRestart=&quot;false&quot;/&gt;
            &lt;/Context&gt;
            &lt;/Host&gt;
            &lt;/Engine&gt;
            &lt;/Service&gt;
            &lt;/Server&gt;
            </pre>
            </li>
            <li>在n <span>conf/server.xml文件里删除</span> <strong>minEvictableIdleTimeMillis</strong> 和 <strong>ti<p class='post-footer'>
   original link:
   <a href='http://Apiaceae.github.io/blog/2009/09/24/JIRA+%2B+MySQL+%2B+Confluence+%E5%AE%89%E8%A3%85/'>http://Apiaceae.github.io/blog/2009/09/24/JIRA+%2B+MySQL+%2B+Confluence+%E5%AE%89%E8%A3%85/</a><br/>
   &nbsp;written by <a href='http://Apiaceae.github.io'>Hooker</a>
   &nbsp;posted at <a href='http://Apiaceae.github.io'>http://Apiaceae.github.io</a>
   </p>

Linux常见问题和操作命令

| Comments

Linux一句话精彩问答——Linux初学者必读(全)


——————————————网络无关篇—————————————
0001 修改主机名(陈绪)
vi /etc/sysconfig/network,修改HOSTNAME一行为"HOSTNAME=主机名"(没有这行?那就添加这一行吧),然后运行命 令" hostname 主机名"。一般还要修改/etc/hosts文件中的主机名。这样,无论你是否重启,主机名都修改成功。

0002 Red Hat Linux启动到文字界面(不启动xwindow)(陈绪)
vi /etc/inittab
id:x:initdefault:
x=3:文本方式 x=5:图形方式

0003 linux的自动升级更新问题(hutuworm,NetDC,陈绪)
对于redhat,在www.redhat.com/corp/support/errata/找到补丁,6.1以后的版本带有一个工具up2date,它能够测定哪些rpm包需要升级,然后自动从redhat的站点下载并完成安装。
升级除kernel外的rpm: up2date -u
升级包括kernel在内的rpm: up2date -u -f

Gentoo升级方法
更新portage tree:  emerge —sync
更新/安装软件包: emerge [软件包名] (如安装vim:  emerge vim)

Debian跟别的发行版还是有很大的差别的,用Debian做服务器维护更加方便;红帽的升级其实挺麻烦的,当然,如果你交钱给红帽的话,服务是会不一样的。
Debian下升级软件:
apt-get update
apt-get upgrade
前提:配置好网络和/etc/apt/sources.list,也可以用apt-setup设置。

0004 windows下看linux分区的软件(陈绪,hutuworm)
Paragon.Ext2FS.Anywhere.2.5.rar和explore2fs-1.00-pre4.zip
现在不少Linux发行版安装时缺省基于LVM建分区,所以explore2fs也与时俱进地开始支持LVM2:
http://www.chrysocome.net/downloads/explore2fs-1.08beta9.zip
迅雷专用下载  

0005 mount用法(sakulagi,sxsfxx,aptkevin)
fat32的分区 mount -o codepage=936,iocharset=cp936 /dev/hda7 /mnt/cdrom
ntfs的分区 mount -o iocharset=cp936 /dev/hda7 /mnt/cdrom
iso文件 mount -o loop /abc.iso /mnt/cdrom
软盘 mount /dev/fd0 /mnt/floppy
USB闪存 mount /dev/sda1 /mnt/cdrom
在有scsi硬盘的计算机上,如果用上面的命令挂载usb闪存,则会mount到/boot分区。这种情况,应该先用fdisk -l /dev/sd? 来看看到底usb闪存盘是在哪个设备下(通常会是sdb或者sdc)。比如某台机器上,就是在sdc1上面。
所有/etc/fstab内容 mount -a
可以指定文件格式"-t 格式", 格式可以为vfat, ext2, ext3等.
访问DVD mount -t iso9660 /dev/dvd /mnt/cdrom或mount -t udf /dev/dvd /mnt/cdrom
注意:dvd的格式一般为iso9660或udf之一

0006 在vmware的LINUX中使用本地硬盘的FAT分区(陈绪)
将本地的FAT分区共享,然后在VMWARE中使用SMBFS挂上。可以将如下的行放到/etc/fstab中:
//win_ip/D$ /mnt/d smbfs defaults,auto,username=win_name,password=win_pass,codepage=936,iocharest=gb2312 0 0
其中win_ip是你的windows的IP地址;
D$是你的windows里面共享的D盘的共享名;
/mnt/d是要将该分区mount到linux的目录;
win_name和win_pass是你的WINDOWS里面可以读取该分区的用户,比如你的管理员名和密码。
如果你运行了/etc/rc.d/init.d/netfs,那么在启动的时候就会自动挂载这个分区。

0007.a 删除名为-a的文件(陈绪)
rm ./-a
rm — -a  告诉rm这是最后一个选项,参见getopt
ls -i 列出inum,然后用find . -inum inum_of_thisfile -exec rm '{}' \;

0007.b 删除名为\a的文件(陈绪)
rm \a

0007.c 删除名字带的/和‘\0'文件(陈绪)
这些字符是正常文件系统所不允许的字符,但可能在文件名中产生,如unix下的NFS文件系统在Mac系统上使用
1.解决的方法,把NFS文件系统在挂到不过滤'/'字符的系统下删除含特殊文件名的文件。
2.也可将错误文件名的目录其它文件移走,ls -id 显示含该文件目录的inum,umount 文件系统,
clri清除该目录的inum,fsck,mount,check your lost+found,rename the file in it.
最好是通过WINDOWS FTP过去就可以删除任何文件名的文件了!

0007.d 删除名字带不可见字符的文件(陈绪)
列出文件名并转储到文件:ls -l  >aaa
然后编辑文件的内容加入rm命令使其内容成为删除上述文件的格式:
vi aaa
[rm -r *****
]
把文件加上执行权限 chmod +x aaa
执行 $aaa

0007.e 删除文件大小为零的文件(陈绪)
rm -i find ./ -size 0
find ./ -size 0 -exec rm {} \;

find ./  -size 0 | xargs rm -f &

for file in
   #自己定义需要删除的文件类型
do
    if [ ! -s ${file} ]
    then
        rm ${file}

        echo "rm $file Success!"
    fi
done

0008 redhat设置滚轮鼠标(mc1011)
进入X后,选择鼠标的配置,选择wheel mouse(ps/2)就可以了,
如果鼠标表现异常,重启计算机即可。
(或者su, vi /etc/X11/XF86Config, 把PS/2 改成 ImPS/2)

0009 加装xwindow(陈绪)
用linux光盘启动,选择升级,然后单独选择包,安装即可

0010 删除linux分区(陈绪)
做一张partition magic的启动软盘,启动后删除. 或者用win2000的启动光盘启动,然后删除.

0011 如何退出man(陈绪)
q

0012 不编译内核,mount ntfs分区(陈绪,hutuworm,qintel)
原装rh8,未升级或编译内核
1. 上google.com搜索并下载 kernel-ntfs-2.4.18-14.i686.rpm
2. rpm -ivh kernel-ntfs-2.4.18-14.i686.rpm
3. mkdir /mnt/c
4. mount -t ntfs /dev/hda1 /mnt/c

Read only: http://www.linux-ntfs.org/
Read/Write: http://www.jankratochvil.net/project/captive/

0013 tar 分卷压缩和合并(WongMokin,Waker)
以每卷500M为例
tar分卷压缩:tar cvzpf – somedir | split -d -b 500m
tar多卷合并:cat x
> mytarfile.tar.gz

0014 使用lilo/grub时找回忘记了的root口令(陈绪)
三种办法:
1.在系统进入单用户状态,直接用passwd root去更改
2.用安装光盘引导系统,进行linux rescue状态,将原来/分区挂接上来,作法如下:
cd /mnt
mkdir hd
mount -t auto /dev/hdaX(原来/分区所在的分区号) hd
cd hd
chroot ./

passwd root
这样可以搞定
3.将本机的硬盘拿下来,挂到其他的linux系统上,采用的办法与第二种相同
rh8中
一. lilo
   1. 在出现 lilo: 提示时键入 linux single
      画面显示 lilo:  linux single
   2. 回车可直接进入linux命令行
   3. #vi /etc/shadow
      将第一行,即以root开头的一行中root:后和下一个:前的内容删除,
      第一行将类似于
      root::……
      保存
   4. #reboot重启,root密码为空
二. grub
   1. 在出现grub画面时,用上下键选中你平时启动linux的那一项(别选dos哟),然后按e键
   2. 再次用上下键选中你平时启动linux的那一项(类似于kernel /boot/vmlinuz-2.4.18-14 ro root=LAB
   original link:
   <a href='http://Apiaceae.github.io/blog/2009/09/24/Linux%E5%B8%B8%E8%A7%81%E9%97%AE%E9%A2%98%E5%92%8C%E6%93%8D%E4%BD%9C%E5%91%BD%E4%BB%A4/'>http://Apiaceae.github.io/blog/2009/09/24/Linux%E5%B8%B8%E8%A7%81%E9%97%AE%E9%A2%98%E5%92%8C%E6%93%8D%E4%BD%9C%E5%91%BD%E4%BB%A4/</a><br/>
   &nbsp;written by <a href='http://Apiaceae.github.io'>Hooker</a>
   &nbsp;posted at <a href='http://Apiaceae.github.io'>http://Apiaceae.github.io</a>
   </p>

Ubuntu服务器配置Ruby on Rails开发环境

| Comments

首先安装Ubuntu服务器版本 Server,我使用的是9.04版本
UPDATED FOR UBUNTU 9.04 HARDY HERON
* Ubuntu packages information [http://packages.ubuntu.com/]
Originally based on Ref: [http://www.rubystarman.org/wiki/UbuntuEdgyEft]

Install Ubuntu
* Download iso for Ubuntu, use it to install barebone server (without LAMP)
* uncomment universe, security and multiverse sources in /etc/apt/sourses.list, comment out cdrom source

Upgrade installed server
sudo apt-get update
sudo apt-get dist-upgrade
Install Ruby and other things
sudo apt-get install ssh ruby ruby1.8 ri1.8 rdoc1.8 irb1.8 irb rdoc <br /> libreadline-ruby1.8 libopenssl-ruby1.8 libmysql-ruby libfcgi-ruby1.8 <br /> libsqlite3-ruby build-essential ruby1.8-dev libpcre3-dev libssl-dev <br /> libdb4.3-dev libneon26-dev python-dev python-setuptools python-docutils <br /> python-clearsilver python-pysqlite2 enscript nmap libncurses5-dev <br /> libsqlite3-dev sqlite3 sqlite3-doc libbz2-dev expat libexpat1-dev, git-core
download !RubyGems
create ~/software dir, go to !RubyGems website [http://docs.rubygems.org/] to find download url.
In my case it was !http://rubyforge.org/frs/download.php/35283/rubygems-1.1.1.tgz

cd \~/software
wget (URL to download)
tar xf (downloaded filename)
cd (unarchived directory)
sudo ruby setup.rb
sudo gem install rails mongrel –include-dependencies
Select which gem to install for your platform (i486-linux) [Select 2 for Ruby]
&nbsp;1. mongrel 1.0.1 (mswin32)
&nbsp;2. mongrel 1.0.1 (ruby)
&nbsp;3. mongrel 1.0 (mswin32)
&nbsp;4. mongrel 1.0 (ruby)
&nbsp;5. Skip this gem
&nbsp;6. Cancel installation
> 2
Select which gem to install for your platform (i486-linux) [Select 1 for Ruby]
&nbsp;1. fastthread 1.0 (ruby)
&nbsp;2. fastthread 1.0 (mswin32)
&nbsp;3. fastthread 0.6.4.1 (mswin32)
&nbsp;4. fastthread 0.6.4.1 (ruby)
&nbsp;5. Skip this gem
&nbsp;6. Cancel installation
> 1
Install MySQL
sudo apt-get install mysql-server
* after creating a user for yourself you can add its data into .my.cnf file. After you've done it you can get to mysql just by typing mysql in command line
cd
touch .my.sql
echo "[client]
user = DBUSERNAME
password = DBPASSWORD
host = DBSERVER
[mysql]
database = DBNAME" > .my.cnf
chmod 400 .my.cnf
Sun Java
sudo apt-get install sun-java6-jdk sun-java6-plugin
#then
sudo update-java-alternatives
Jruby
* Get latest src for jruby from [http://dist.codehaus.org/jruby/]
in my case it was !http://dist.codehaus.org/jruby/jruby-src-1.1.2.tar.gz

cd \~/software
tar zxvf (downloaded filename)
cd (unarchived directory)
ant clean jar
cd /usr/local
sudo mv \~/software/(unarchived directory) .
sudo ln -s (unarchived_directory) jruby
echo "export PATH=$PATH:/usr/local/jruby/bin" >> \~/.bashrc
. \~/.bashrc
jruby -S gem install jruby-openssl rails rake mongrel hpricot haml activerecord-jdbcmysql-adapter activerecord-jdbcderby-adapter glassfish
# if rails install gives out of memory error try
jruby -J-XX:-UseGCOverheadLimit -S gem install rails
Install Apache 2.2
* Apache 2.2 is now distributed with feisty 7.04 so compiling by source is not needed for plain vanilla install
* Get Apache 2.2 code: go to [http://httpd.apache.org/download.cgi] and find the right link to download
In my case it was !http://download.filehat.com/apache/httpd/httpd-2.2.8.tar.gz

cd \~/software
wget (URL to download)
tar xf (downloaded filename)
cd (unarchived directory)
./configure –with-external-pcre=/usr –with-included-apr –with-berkeley-db=/usr <br /> &nbsp;—enable-deflate –enable-rewrite –enable-auth-digest&nbsp; –enable-dav=shared <br /> &nbsp;—enable-proxy=shared –enable-proxy-balancer=shared –enable-proxy-http=shared <br /> &nbsp;—enable-ssl=shared –enable-headers=shared
make
sudo make install
Note: for webdav filesystem add the following:
–enable-dav-fs=shared&nbsp; –enable-setenvif=shared –enable-alias=shared –enable-authn-file=shared
Install mod_fcgid
go to mod_fcgid website [http://fastcgi.coremail.cn/] find download url
in my case it was !http://prdownloads.sourceforge.net/mod-fcgid/mod_fcgid.2.1.tar.gz?download

cd \~/software
wget (URL to download)
tar xf (downloaded filename)
cd (unarchived directory)
make
sudo make install
Install Subversion
libneon 0.26 in Ubuntu 8.04 comes without one library. So we will complile neon as well
Currently subversion needs !http://www.webdav.org/neon/neon-0.25.5.tar.gz

cd \~/software
wget (URL to download
tar xf (downloaded filename)
cd (unarchived directory
./configure –with-ssl –enable-shared
make
sudo make install
go to Subversion website [http://subversion.tigris.org/] find download url
in my case it is !http://subversion.tigris.org/downloads/subversion-1.4.6.tar.gz
cd \~/software
wget (URL to download)
tar xf (downloaded filename)
cd (unarchived directory)
./configure –with-apr=/usr/local/apache2 –with-apr-util=/usr/local/apache2 –with-neon=/usr/local
make
sudo make install
Install svn-python
Subversion comes with a Python binding that Trac will use.

cd \~/software/(subversion directory)
make swig-py
sudo make install-swig-py
Python came with Ubuntu so it's in /usr but subversion installed the library in /usr/local. We'll have to link them up.
sudo nano /usr/lib/python2.5/site-packages/svn.pth
#The file should contain a single line, the path to svn-python:
/usr/local/lib/svn-python
install Trac
As of this writing, version 0.10.3.1 is the current stable release.
Or you can use 0.11beta version instead
Trac download [http://trac.edgewall.org/wiki/TracDownload]
in my case it was [http://ftp.edgewall.com/pub/trac/trac-0.10.4.tar.gz]

cd \~/software
wget (URL to download)
tar xf (downloaded filename)
cd (unarchived directory)
sudo python setup.py install
Install mod_python
To best run Trac under Apache 2.2 you'll want mod_python.
mod_python download [http://httpd.apache.org/modules/python-download.cgi]
in my case it was [http://mirror.olnevhost.net/pub/apache/httpd/modpython/mod_python-3.3.1.tgz]

cd \~/software
wget (URL to download)
tar xf (downloaded filename)
cd (unarchived directory)
./configure –with-apxs=/usr/local/apache2/bin/apxs
make
sudo make install
Install !SilverCity
 Not needed for Trac 011
!SilverCity provides additional syntax highlighting for Trac. It has Ruby and CSS support which enscript lacks.
!SilverCity website [http://sourceforge.net/projects/silvercity/]
in my case it was [http://downloads.sourceforge.net/silvercity/SilverCity-0.9.7.tar.gz]

cd \~/software
wget (URL to download)
tar xf (downloaded filename)
cd (unarchived directory)
sudo python setup.py install
!WebAdmin for Trac
 Not needed for Trac 0.11
The next major version of Trac will come with !WebAdmin. We can get it now as a plugin. When downloading plugins from

   original link:
   <a href='http://Apiaceae.github.io/blog/2009/09/24/Ubuntu%E6%9C%8D%E5%8A%A1%E5%99%A8%E9%85%8D%E7%BD%AERuby+On+Rails%E5%BC%80%E5%8F%91%E7%8E%AF%E5%A2%83/'>http://Apiaceae.github.io/blog/2009/09/24/Ubuntu%E6%9C%8D%E5%8A%A1%E5%99%A8%E9%85%8D%E7%BD%AERuby+On+Rails%E5%BC%80%E5%8F%91%E7%8E%AF%E5%A2%83/</a><br/>
   &nbsp;written by <a href='http://Apiaceae.github.io'>Hooker</a>
   &nbsp;posted at <a href='http://Apiaceae.github.io'>http://Apiaceae.github.io</a>
   </p>

Copyright © 2013 - Hooker - Powered by Octopress